Showing posts with label Snacks. Show all posts

Wednesday, May 9, 2012

My Homemade Yogurt Just Got Better!

I've been making my Homemade Yogurt for a while now.  I've experimented and perfected my process to come up with the Yummiest Homemade Yogurt.  Or at least I thought so, until today.

I've been making yogurt so often lately that my daughter sees me pouring hot milk into jars in the sink and knows exactly what's going on.  It's still good on granola and with fruit, but the plain yogurt is just that - plain.  I was craving some of the grocery store flavors - like key lime, and raspberry.  When I mentioned to HandyMan that I was thinking of experimenting, he requested vanilla.

If you look at the basic flavored grocery store yogurts, the additives are basically flavoring and gelatin.  I checked out a few recipe sites that had varying combinations of adding gelatin to yogurt and knew I wanted mostly yogurt and just enough gelatin to add flavor and get it to set up a little firmer than our homemade plain.

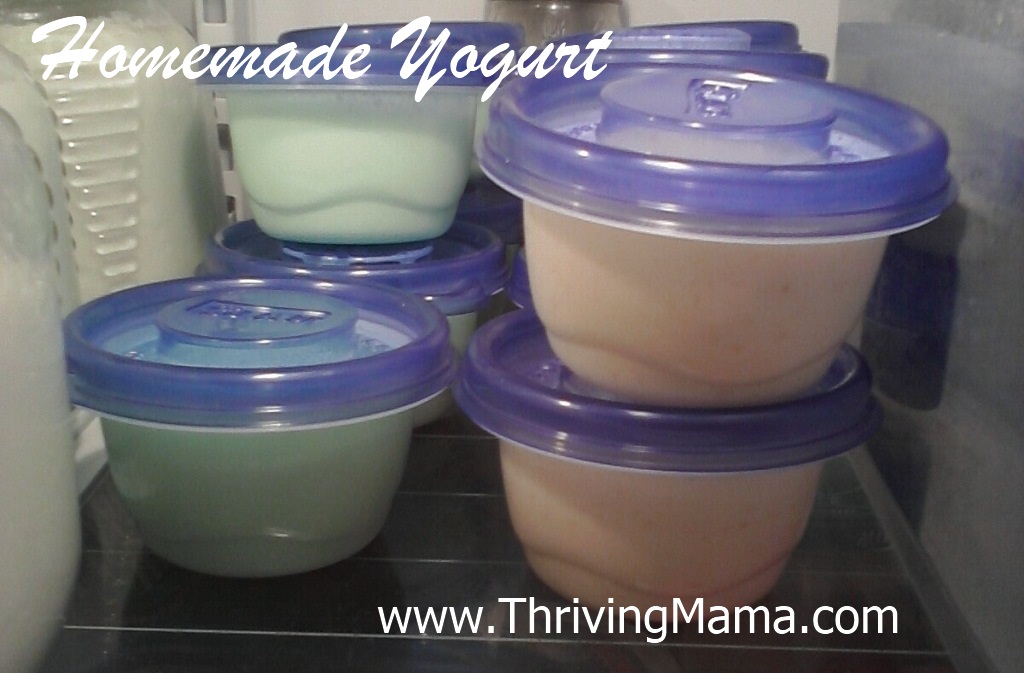
Here's the recipes I tried and they worked beautifully!  The flavors are subtle and the sugar in the recipe and in the gelatin mix adds a bit of smoothness to the plain yogurt.  I got 16 of the little 1/2 cup containers with lids and these make fantastic on-the-go snacks and are easy to toss in HandyMan's lunches.  I think I will probably add some 1-cup containers to the stash too - the 1/2 cups are great for snack size and kiddos, but if I were grabbing one for lunch on the go - it'd be a little small.  I've used yogurt straight from the incubator as well as refrigerated yogurt for these recipes and both worked great!

Homemade Vanilla Yogurt
3 cups Homemade Plain Vanilla
3/4 cup milk
1/3 cup sugar
1 Tablespoon Vanilla Extract
1 envelope Unflavored Gelatin

Bring milk and sugar to a boil.  Add gelatin and stir until completely dissolved.  Then stir some more to really make sure it's dissolved - otherwise you end up with gelatin granule chunks in your yogurt and it definitely takes away from the experience.  Just sayin'.   Add Vanilla and mix thoroughly.  Combine this syrup/gelatin mixture with yogurt in a blender and pour into individual cups or container.  Refrigerate until it sets.


Homemade [Gelatin Flavor] Yogurt
3 cups Homemade Plain Vanilla
3/4 cup boiling water
1- Box of Gelatin (box intended to add 2 cups of water to make 4-1/2 cup servings, flavor of your choice)

Add gelatin to hot water and stir until completely dissolved.  Combine the jello mixture with yogurt in a blender and pour into individual cups or container.  Refrigerate until it set.

***
Cost wise - I've been able to get milk for about $2.15 a gallon and gelatin runs anywhere from $0.35-$0.65 a box.  Calculated out, it runs about $0.13-$0.18 per 6 ounce serving.  The reusable cups were a $5 up-front investment.  All told, it fits quite nicely in my grocery budget!

Next up - experimenting with adding fruits!


Linked up at We Are That Family's Works for Me Wednesdays.


Friday, May 4, 2012

Back to Freezer Fridays: Cran-Apple Crisp Bars

Way back when, I posted a regular Freezer Friday post of what batch cooking I'd done that week or fresh produce had been put away for the colder months to come.  Life shifted, things change and I lost track of the habit.

A few things have pushed me back into the practice:
1.  I'm having a baby in 7 weeks (more or less).  I know the farther into the pregnancy I get, the less I'm going to want to cook.  And after the baby gets here, the easier the meals are - the better!
2.  I've gotten my hands on some great domestic produce lately and it was begging to be canned/frozen.
3.  I inventoried the freezer and found a lot of random ingredients that will be much better in a complete meal than getting frost-bite on their own little container in the corner of the freezer.

As an added bonus, a blog I follow is running a "Four Weeks to Fill Your Freezer" feature in May so I'm hoping to get some good recipes from there!

So I bring back Freezer Fridays.  In the past I posted a lot of original recipes.  Not so much anymore.  I've found and altered a lot of the online recipes I find that have turned out fantastic.  I will put the alterations in along with the links to the recipes.  I really don't have time to reinvent the wheel here!

Without further ado, here's what went into the freezer this week (and what random ingredients I used up from the freezer!)

Cran-Apple Crisp Bars:
I started with this Cranberry Oat Bar recipe that I've made before and loved.  I altered it.  A lot.  So here's my version.  And since I was cooking for the freezer, and using up cranberries I had in the freezer- I tripled it to make 3-8x8 pans.

Filling

6 cups fresh or frozen cranberries
2 cup sugar
1 cup Unsweetened Apple Sauce

In a small saucepan over medium high heat, combine the cranberries, white sugar and apple sauce. Bring to a boil, then reduce heat and cook until the mixture has reduced to a jam-like consistency.

Crumble
1 1/4 white whole wheat flour
1 1/2 cups rolled oats
1 cup packed light brown sugar
1 teaspoon baking powder
1/2 teaspoon salt
3/4 cup margarine


In a medium bowl, cream together margarine and brown sugar.  Combine dry ingredients and mix into margarine/butter batter. Press half of this mixture firmly into the bottom of prepared pan (wax paper for freezer or liberally greased for oven). Spread the cranberry sauce evenly over the base, then crumble the remaining oat mixture over the top.

At this point, all three of mine went to the freezer.  When it's time to bake them, I'll take them out, remove wax paper, put them in a greased pan and bake in a preheat oven to 350 degrees F for 10 to 15 minutes (probably a little longer), until the top is golden brown and filling is bubbly.

Cool completely before cutting into bars.

* * * * *

Also to the freezer/pantry this week:

  • Roasted Tomato Marinara (Thanks Florida for the awesome tomatoes!) - This was a one-off type deal.  I skimmed over a few recipes and made it up as I went along.  The end result is really yummy, sadly I don't have an exact recipe.
  • Bacon Egg & Cheese Sandwiches


Tuesday, October 19, 2010

Salt & Balsamic Roasted Pumpkin Seeds

pumpseedIt's October and here is the United States, that means it's pumpkin season! Whether you're stocking up on pumpkins to bake with or to carve up and decorate with, you will inevitably be faced with one messy decision: to roast the pumpkin seeds or to toss them. Pumpkin seeds are loaded with nutrients like zinc, iron and low in calories. What's not to like?


It seems that almost every time I've cleaned out a pumpkin, I've tediously separated out the seeds from the muck with intentions for a healthy, yummy snack. Inevitably, I roast the seeds and they're alright. I nibble on them them fresh from the oven, throw them in a container and they're never “good enough” to be a draw when I want a snack later. Eventually the container will end up emptied in the trash.


This year, I did some research, changed my method and had to hold myself back from eating the whole tray of seeds from the oven!  The best part, a week later stored in a sealed jar and they're still super crunchy!  Here are some of the tips I found and implemented for this year's pumpkin seeds:


  1. Rinse the Seeds: Once I had separated the pumpkin seeds from the orange muck, I rinsed them thoroughly to remove any remaining bits of pumpkin flesh. I couldn't rinse them enough to remove the sliminess but did get all the orange off.


  2. Boil the Seeds: After rinsing my seeds, I boiled them in heavily salted water (1 Tablespoon salt to 1 cup water) for 20 minutes. This removed a little bit more of the sliminess and infused the seeds with a little bit of salty flavor.


  3. Dry the Seeds: I drained the seeds and spread them out on a baking sheet. I let them dry overnight. They didn't dry completely but did dry down.


When ready to roast the seeds, I mixed my marinade and tossed the seeds in the marinade. Spread the seeds back out on the baking sheet and baked them at 325. I stirred them after fifteen minutes intervals at a time and roasted them until they were golden brown and completely dry.


For about 3 cups of pumpkin seeds I used this marinade:  2 Tablespoon Olive Oil, 1 Tablespoon Balsamic Vinegar and 1 teaspoon of salt and 1/2 teaspoon of pepper.  Shake it all up and pour it over the seeds and toss them thoroughly.  The vinegar didn't come through quite as much as I would have liked, but they're still pretty yummy!


Check out my guest post at Quick Easy Cheap Healthy for my Pumpkin Pie Spice Roasted Seed recipe!


This post is linked up to An Oregon Cottage's Tuesday Garden Party

Friday, October 15, 2010

Freezer Friday: Sugar Cookies Made Easy

Sugar cookies are such a festive cookie adaptable for as many occasions as you can invest in cookie cutters or decorations.  Rolling out the dough and frosting them can be such a fun family activity too!  Most times, I get them rolled out, baked and decorated with the butter cream frosting and stand back and think "now what?"  I can't stack them up on a tray or storage bag or all the frosting will get mashed up.  I could throw them all in the freezer and then stack them and freeze them - but they just wouldn't be as good frozen and thawed later.

A couple years ago I came upon a great frosting recipe that sets beautifully and dry on the surface but moist underneath.  Bingo!  That takes care of part of the dilemma.  But what about the mess of mixing, rolling, and cutting?  This year I decided that I could mix, roll and cut all in one big party, and then freeze the cut out cookies before I bake them.  Pull what I need for a given occasion and bake them.  Mix up frosting and voila! Ready to go with half the mess.

So, here's how it breaks down:

1.  Make a batch (or 2) of your favorite sugar cookie recipe.  I use The Best Rolled Sugar Cookie recipe and it has always turned out great.  When I mix two, I'll mix the first, empty the bowl, and then mix the second - in my world of dish loathing there's no point in washing in between if you're making the exact same recipe.

sugcookie1

2.  Roll, cut, layer, freeze.  Repeat. Repeat.  Repeat.  Until the dough is gone.  A round cookie cutter (glass) will give you an all occasion shaped cookie.  I am working with pumpkins and fall leaves as I have three parties coming up for which fall theme will be appropriate.  Once the cookies were frozen between layers of wax paper, I stacked them in a plastic container before they found their somewhat temporary home in the freezer.

sugcookie2 sugcookie5

3.  Pull and bake what you need and mix up an adequate amount of icing.  I love this recipe because you can dip your cookies in and it dries glossy.  Take a bit of the remaining icing and add a little more powdered sugar to thicken it up and it pipes on nicely for accents.  If you don't have a pastry bag or decorating tips, no problem.  Put the frosting in a freezer zip top bag and cut a tiny opening in one of the corners.  Decorate away.

4.  Once the frosting has set, your cookies can be stacked and displayed on a tray - party perfect!

sugcookie4

Then, the next time you need a cookie tray, repeat steps 3 and 4 until your freezer stash of cookies is gone.

This post is linked up at Life As Mom's Frugal Friday: Gearing Up for the Holidays.

Monday, September 27, 2010

Caramel Apple Bars

applesLast weekend I was tasked to bring dessert to my brother's place as we all converged for a visit. I had apples to use and thought about making Apple Crisp. But, the house was chilly on Thursday night and I was afraid that if I made crisp the day before it would be closer to Apple Soggy instead of Apple Crisp.


Off I went into cyberspace for inspiration. I found these Apple Bars and then went to work modifying the recipe. The result was amazing! We had them with ice cream for dessert on Friday, nibbled them with coffee on Saturday morning and by the time I left on Saturday afternoon folks were picking at the crumbs.


I doubled this recipe for a large jelly roll pan. This recipe will work nicely for a 9x13. Enjoy this delicious bit of fall!


Caramel Apple Bars


1/3 cup Melted Butter or Margarine


1/2 cup Sugar


½ cup Brown Sugar


¼ cup Yellow Squash Puree


1 egg


½ tsp Vanilla Extract


1 cup All-purpose Flour


1 cup White Whole Wheat Flour


2 tsp Baking Powder


½ tsp Ground Cinnamon


2 cups finely chopped Apple


Glaze


¼ cup Whipping Cream


¼ cup Brown Sugar


¼ cup Butter


½ cup Powdered Sugar


Directions:


  1. Thoroughly combine butter, sugars, egg, yellow squash and vanilla.


  2. Add Flours, cinnamon and baking powder and mix. Fold in apples.


  3. Spread batter into a greased 9x13 pan and bake for 35-45 minutes at 350, just until the edges are golden and the center doesn't jiggle.


    AppleBars


  4. Glaze: Combine cream, butter and ¼ cup brown sugar in a small saucepan. Heat to boiling, stirring constantly. Reduce heat and allow to boil for 2 minutes. Remove from heat and add powdered sugar and mix until all powdered sugar is dissolved into the caramel. Drizzle over cooled bars. {sorry, no finished picture - they were enjoyed before I could get the camera out}


  5. Cut into squares and enjoy!


    This post is linked up at Things I Love Thursday.


Wednesday, September 8, 2010

Making Apple Sauce

applesauce1I'm not getting much from my garden right now to store away, but I have been able to take advantage of great deals from the produce market to put fresh items away for winter.  Yesterday was applesauce day in my kitchen.  I can get a half bushel bag of "seconds" apples from my local produce stand for $5.  Add about an hour of work and I have 12 pints of fresh made, no sugar added, super yummy apple sauce.

Mostly because I have a cool attachment for my MamaMixer that separates the apple from the peel and core.  I chop the apples, boil them for about 7 minutes and send them through.  Out one side comes the apple debris and out the bottom comes the apple sauce!  It's a fabulous invention that does all the work for me!

applesauce2

Linked at Works for Me Wednesday and An Oregon Cottage's Tuesday Garden Party.

Wednesday, August 18, 2010

Grown Up Granola Bars

HandyMan volunteers as an assistant coach with our local high school soccer team and pre-season practices start this week.  Since HandyMan is not too far removed from those he is coaching, he comes home with the appetite similar to that team members.  So for soccer season, I make sure to have lots of dense snacks around that are sure to fill him up - and balance some of the calories with some healthy stuff.

granbarsThis is one of those recipes.  We love the sweet and salty combination found in a certain commercial granola bar and I like to use whole grains where possible.  This trifecta perfectly matches great taste, healthy whole grains and budget friendly all into one dense snack!

Grown Up Granola Bars


4 cups Quick Oats (Rolled oats may not hold together as well)

2 cups White Whole Wheat Flour

1 cup Wheat Germ

1/2 cup Ground Flax Seeds

3/4 cup Brown Sugar

1/2 cup Honey (I used part cheap pancake syrup as I didn't have enough honey on hand)

3 Eggs, beaten

1 cup Vegetable Oil

2 cups Chocolate Chips

2 cups Dry Roasted Peanuts (coarsely chopped)

Directions

1.  Beat together oil, honey, brown sugar and eggs.

2.  In a separate bowl, combine oats, flour, flax seeds and wheat germ.

3.  Add wet ingredients to dry ingredients and mix until thoroughly incorporated. Then fold in peanuts and chocolate chips.

4.  Press dough into a large jelly roll pan (11" x 16").  Bake at 350 degrees for 25-30 minutes or until edges are golden brown.

5.  Allow to set about 10 minutes, cut in the pan and then allow to cool completely before removing from the pan.  Store in an airtight container.  I cut them to fit in the snack size baggies and usually get about 36 out of a pan.

This post is linked up to Life as Mom's Frugal Friday and It's A Blog Party: Delicious Dishes

Monday, July 12, 2010

Dozen Layer Finger Jello

layerjello

Most of the yummy jello recipes that I am fond of, originated from my Aunt Joyce.  I'm not usually a fan of straight up jello but certain combinations are so yummy.  This weekend we were expecting to have a bunch of kids around and most kids like jello, right?  I went searching and found this recipe for 12 Layer Finger Jello and it was very pretty, pretty fun and yummy too!

After making it, here are a few tips:

1.  Make sure you have a timer handy.  Each layer will take about 10 minutes to set in the fridge. Mix the jello, Pour the sour cream layer, set the timer, [go do something else], let the clear layer cool on the counter, turn water on to boil, pour clear layer, mix next batch, repeat.    My electric tea pot was also very useful.

2.  Consider a 11x14 pan- or a couple fewer layer - it filled the 9x13 up almost to the top.

3.  Make sure the shelf in the fridge is as level as possible for even layers.

Linked up at  Life as Mom's Picnic Recipe Swap

Wednesday, June 9, 2010

Cranberry Oat Bars

cranbars2After cruising some of my favorite recipe sites yesterday looking for a good bar recipe that would use up something - anything - from the freezer, I came up with this recipe for Cranberry Bars. I didn't have all the ingredients, so I modified.   I doubled it and it worked wonderfully in a jelly-roll pan.  Here's the finished recipe - and they are very yummy!

Update 6/14/2010 - My bars did turn out rather cakey.  If you are looking for more of a cookie type bar, reduce the baking powder to 2 teaspoons.

Cranberry Oatmeal Bars


Ingredients

1 (12 ounce) package whole cranberries

3/4 cup white sugar

3/4c. water (1/2 cup if frozen cranberries)

____

1 1/4 c. All Purpose Flour

1 cup White Whole Wheat Flour

3.5 tsp Baking Powder,

1 teaspoon vanilla

3/4 cup butter, melted

2 eggs

½ c. milk

1 cup rolled oats

3/4 cup packed light brown sugar

Directions:

1.  In a saucepan over medium heat, combine the cranberries, white sugar, and water. Cook, stirring occasionally.  Once liquids begin to boil, mash lightly with a potato masher to "pop" the cranberries.  Cook until the mixture is thick, about 15 minutes. Remove from heat, and set aside to cool completely.

2. Preheat the oven to 350 degrees F (175 degrees C).

3. In a large bowl, mix together the flours, baking powder, oats, brown sugar.  Add melted butter, vanilla and eggs. Set aside about 1/3 of the mixture, and spread the rest into the bottom of a 9x13 inch baking dish. Pack down to form a solid crust, getting it as even as possible. Spread the cooled cranberry mixture over the crust. Pinch off pieces of the remaining mixture and place evenly over the cranberry layer.

4. Bake for 35 to 40 minutes in the preheated oven, until the top is lightly browned. Cool in the pan for about 40 minutes before slicing into bars.

~*~Thanks for visiting!  Subscribe to ThrivingMama via RSS or by Email and never miss a post!  Or follow me on Facebook!~*~

Tuesday, May 25, 2010

Pear Teething Cookies/Snack Sticks

I’m working on cleaning out the freezer before our summer produce moves into it’s winter digs.  While sorting through stuff I came across some baby food that I had made for GBaby a while back and never used.  The veggies I’ve hidden neatly in things like the HV Blueberry Bread and the HV Zucchini Bread.  Applesauce is fair game at anytime for anyone so I'm  not so worried about that.  Then I came across some pears.

I have wanted to make the Banana Teething Cookies again.  Although GBaby has cut all her teeth, she really likes this type of cookie best, especially if they’re coming from the freezer.  So I took the same ideas as the banana cookies – lots of fruit, little sugar, whole grain flours and came up this these Pear Snack/Teething Sticks. I have to say, they’re pretty darn good!  I’m thinking about pureeing some frozen peach I have to make another batch and it would probably work very well with applesauce too!

Are they ready yet Mom?
pearcookiesPear Breadstick Snack/Teething Cookie

1 cups pureed Pear [or whatever type of fruit you want]

2 eggs [substitute 4 egg yolks instead of two eggs for children under 1 year old]

½ cup Brown Sugar

2 cups White Whole Wheat Flour

1 ½ cups Unbleached Flour

1 teaspoon Baking Soda

Directions

1.  Beat eggs and brown sugar until smooth.  Add pear and blend thoroughly.

2.  Add flours 1/2 cup at a time until you reach a thick dough – should be similar to a soft play dough.  You may need more or less depending on the type of flour you use

3. Divide dough into 6 pieces and roll out into long ropes about 1/4 inch thick.  Cut into pieces 3-4″ long and flatten slightly.

4. Bake at 350 for 20-30 minutes or until golden brown for a breadstick type snack.   Bake at 325 for 35-40 minutes for a hard teething cookie.

~*~Thanks for visiting!  Subscribe to ThrivingMama via RSS or by Email and never miss a post!  Or follow me on Facebook!~*~

Thursday, February 11, 2010

Apple Cinnamon Granola Bars

granolabarIf you're visiting from Life as Mom's Ultimate Recipe Swap, welcome!  I made these back in February and plan to make them again this fall as soon as I get apples dehydrated.  They are so yummy and can double as a snack or a dessert with a bit of icecream or yogurt!  Enjoy!

As part of my February Kitchen Challenge I'm working on finding healthier snacks to keep in the house.  I came across this granola bar recipe and started tweaking.  The result is an absolutely delicious bar that is loaded with healthy stuff.  I had a couple pieces straight from the oven with plain yogurt and it was fantastic-and could easily become habit forming! If they make it to the freezer they will be great airplane food for our trip later this month.

It fully meets my Whole Grain challenge and has some fruit and nuts thrown in for good measure. The honey flavor is prominent and they are rather sweet.  I think next time I will cut the brown sugar and honey to 3/4 cup each and add more pecans.  If you experiment before I do, please let me know how it turns out.

Apple Cinnamon Granola Bars


(Note: I made this recipe in a jelly roll pan, if you are using a 9x13, cut recipe in half)

2 cups Quick Oats

1 cup Brown Sugar

2 cups Whole Wheat Flour

1 cup All Purpose Flour

2 teaspoons Cinnamon

2Eggs

1 cup of Honey

1 cup Vegetable oil

2 cups dehydrated Apple Bits

1 cup chopped Pecans

Directions:

1.  Place all dry ingredients in a bowl and blend.

2.  Add all wet ingredients and mix thoroughly.  (HINT: use the same measuring cup for oil first then honey and the honey will slide right out!)

3.  Fold in Apples and Pecans.

4.  Grease pan liberally and press dough into pan.  I used shortening with a piece of wax paper and then used the wax paper to press the dough into the pan - worked great as dough is sticky.

5.  Bake at 350 for 40 minutes or until edges turn golden brown.  Let cool, cut into snack size pieces and enjoy!

Click here for a printable version of this recipe.

Tuesday, September 29, 2009

Banana Teething Biscuits/Cookies

GBaby is popping teeth left and right and I'm exploring new foods with her as she begins her journey into finger-foods and table foods.  She is up to seven teeth, so I thought it was time to give teething biscuits a try.  A friend showed up today with a bunch of bananas that needed to be baked with so the challenge was on!  I went through a few recipes and settled on ingredients that were age appropriate for an 8 month old and set to work.  I also didn't want a cookie that was super sweet and wanted to let the bananas add the sweetness.  This is the recipe that I came up with and it worked out great.   GBaby gnawed the heck out of the teething cookie while we ate dinner tonight.

teethcookieBanana Teething Biscuit/Cookie


2 medium Bananas

3 Egg Yolks

1 cup Powdered/Confectioners Sugar

2 1/2 cups Unbleached All Purpose Flour

1 cup Whole Wheat Flour

Directions:

1. Puree bananas and egg yolks until a smooth, thick liquid.

2. Place in mixer bowl and add powdered sugar and mix until smooth.

3. Add flours 1/2 cup at a time until you reach a thick dough - should be similar to a soft play dough.

4. Divide dough into 6 pieces and roll out into long ropes about 1/4 inch thick.  Cut into pieces 3-4" long and flatten slightly.

5. Bake at 325 for 30-45 minutes or until golden brown and hard.

NOTE: It is always important to monitor your child while they are eating any foods. While these cookies are fairly hard it is always possible for small chunks to break off and become a choking hazard.  Always check with your pediatrician or a trusted source regarding age appropriate ingredients for your child.

Click here for a printable version of this recipe.