Wednesday, May 9, 2012
My Homemade Yogurt Just Got Better!
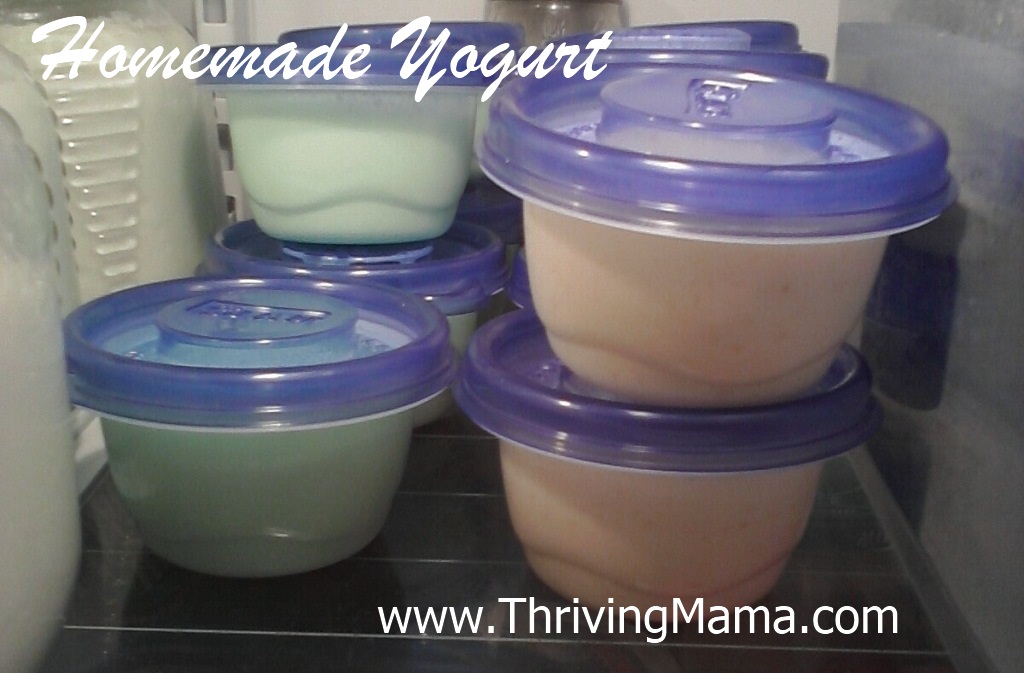
I've been making yogurt so often lately that my daughter sees me pouring hot milk into jars in the sink and knows exactly what's going on. It's still good on granola and with fruit, but the plain yogurt is just that - plain. I was craving some of the grocery store flavors - like key lime, and raspberry. When I mentioned to HandyMan that I was thinking of experimenting, he requested vanilla.
If you look at the basic flavored grocery store yogurts, the additives are basically flavoring and gelatin. I checked out a few recipe sites that had varying combinations of adding gelatin to yogurt and knew I wanted mostly yogurt and just enough gelatin to add flavor and get it to set up a little firmer than our homemade plain.
Here's the recipes I tried and they worked beautifully! The flavors are subtle and the sugar in the recipe and in the gelatin mix adds a bit of smoothness to the plain yogurt. I got 16 of the little 1/2 cup containers with lids and these make fantastic on-the-go snacks and are easy to toss in HandyMan's lunches. I think I will probably add some 1-cup containers to the stash too - the 1/2 cups are great for snack size and kiddos, but if I were grabbing one for lunch on the go - it'd be a little small. I've used yogurt straight from the incubator as well as refrigerated yogurt for these recipes and both worked great!
Homemade Vanilla Yogurt
3 cups Homemade Plain Vanilla
3/4 cup milk
1/3 cup sugar
1 Tablespoon Vanilla Extract
1 envelope Unflavored Gelatin
Bring milk and sugar to a boil. Add gelatin and stir until completely dissolved. Then stir some more to really make sure it's dissolved - otherwise you end up with gelatin granule chunks in your yogurt and it definitely takes away from the experience. Just sayin'. Add Vanilla and mix thoroughly. Combine this syrup/gelatin mixture with yogurt in a blender and pour into individual cups or container. Refrigerate until it sets.
Homemade [Gelatin Flavor] Yogurt
3 cups Homemade Plain Vanilla
3/4 cup boiling water
1- Box of Gelatin (box intended to add 2 cups of water to make 4-1/2 cup servings, flavor of your choice)
Add gelatin to hot water and stir until completely dissolved. Combine the jello mixture with yogurt in a blender and pour into individual cups or container. Refrigerate until it set.
***
Cost wise - I've been able to get milk for about $2.15 a gallon and gelatin runs anywhere from $0.35-$0.65 a box. Calculated out, it runs about $0.13-$0.18 per 6 ounce serving. The reusable cups were a $5 up-front investment. All told, it fits quite nicely in my grocery budget!
Next up - experimenting with adding fruits!
Linked up at We Are That Family's Works for Me Wednesdays.
Friday, March 23, 2012
KitchenAid Shredded Chicken
So in flying by comments on a blog-post somewhere in my recent memory, I saw someone mention that you could use your KitchenAid to shred cooked chicken. No WAY! I filed it somewhere in my brain and the thought surfaced again today.
Sometimes I buy a full 40 pound case of boneless/skinless chicken breasts when a local restaurant supply has it on sale. A friend of mine called and investigated their "regular" price this week and found out it wasn't that much more than when it's on sale. I had just used the last of my chicken, so I asked if she was willing to split a case. She was game so I gave her some money and promptly forgot about it.
This morning we were in the middle of Domino Projects since Fridays are HandyMan's day off. The dog goes nuts and up to the door walks my friend with 20 pounds of chicken. Oh yeah. So I quickly package about 12 pounds of it up for the freezer and I remembered the shredded chicken trick I had read. I threw the remaining chicken in my crock pot to cook it:
Mixer on low, three minutes later, shredded chicken:
Oh yeah! It was that easy. I ended up with 8- 2.5 cup containers of shredded chicken in the freezer for tacos, chicken salad, or whatever random meal I need it for in the coming months. I'm so glad that my mommy-brain held on to this little tid-bit of information!
Thursday, April 28, 2011
Frosting & Filling a Layered Cake
For this particular cake, I had two round yellow cakes, blueberry filling and lemon frosting. When I made the frosting, I pulled out about 1 cup of the frosting that was thicker, before I had added enough of the liquid to the frosting to make it easily spreadable. Here's the step by step.
1. Slice the top off the cake that will be the bottom layer so that it is as smooth and flat as possible and position it on your tray.
2. Take the thick frosting and put it in a plastic sandwich bag or piping bag if you have one. Cut the corner of the bag so that it makes a 1/4 inch opening. Pipe the frosting around the edge of the bottom cake layer creating a wall of sorts to hold your filling in.
3. Spoon and spread your filling onto the cake.
4. Add top layer of cake. The frosting wall oozed a little bit but the blueberries stayed right in the middle where I wanted them. The frosting that oozed was easily spread as part of the step 5.
5. Frost the cake with a thin layer of icing to keep all the crumbs in place.
6. Frost with a thick layer of icing to cover the cake.
7. Slice and enjoy!
Monday, March 14, 2011
Kickin' Back Creativity: English Muffins
Here are a few of my own tips:
:: I used half unbleached flour and half white whole wheat.
:: Keep the heat under your pan on low to medium-low so that they will cook thoroughly but not burn.
:: Once the dough had risen, I dumped it out onto the board with corn meal and pressed it out as gently as possible.
:: I flipped the muffins with my fingers, very gently so they wouldn't "fall".
:: Use the edges of dough after you've cut out your muffins to test the heat in the pan
This was not a hard recipe, just a little time consuming on the cooking end. I saw some comments on the King Arthur Flour site about baking them in the oven and flipping them part way through. I may try this next time and think it may work on a baking stone pre-heated in the oven.
Friday, March 4, 2011
Freezer Friday: Defying Winter!
So, I took ten pounds of chicken and packaged them up with BBQ sauce and Fajita Marinade. Thaw and grill. Yum! I threw a couple pieces of chicken in the freezer un-touched to use in upcoming recipes.
As far as the other ten pounds of chicken go, that's where this story gets a little more interesting. And since a picture is worth a thousand words, I'll save myself the typing. This is my grill:
This is the path that I shovelled to my grill:
And this is the packaged up grilled chicken that came into the house smelling like summer, and tasted pretty close to summer too! We had to try the little scrawny piece!
It will get thawed and chopped on top of salads and used in recipes in the coming months as the weather warms up and the signs of spring and summer vanquish the the snow and ice!
Thursday, March 3, 2011
Homemade Vanilla Extract
Tuesday, February 8, 2011
Dish Towel Bib: The Utilitarian Version
As stated in the title, this is the utilitarian version of the dish towel bib. There are lots of other, more creative people out there who better coordinate their materials. I was more concerned with protecting my daughters clothes.
Pattern: To make the pattern, I folded a bib in half and traced it onto a folded piece of paper. Then, when I cut out the neck hole, I cut about 1/4 inch larger than the traced line.
Put it Together: Cut on the neck hole out of the towel and then cut the fold apart at the spot that will be the back of the neck. Pin the bias tape on the cut edges of the towel and sew in place. Sew velcro in place to close the bib in the back. Ta-da! Done.
It took me about an hour and a half to whip out 9 of these. That will be enough to cover mealtimes, finger painting, helping mom cook, etc.
And see how much more coverage we get from our old white bib and the new towel bib:
This post is linked up at
:: Finer Things Friday
:: Life As Mom's Frugal Friday
:: Works for Me Wednesday
Wednesday, January 26, 2011
It's Really That Good! - Homemade Lotion
I'm trying to cut as much chemical stuff out of our household as I can and this idea of making my own lotion seemed like the perfect idea, if it would work. I make my own laundry soap and it works great. I make my own candles and people love them.
A Sonoma Garden does a great job with her lotion directions. I followed them to the letter including monitoring the temperatures and the result was a great, thick, creamy lotion in about ten minutes. I used lavender essential oil and only 20 drops (to the recommended 24-36 drops). The fragrance is very light and I have no qualms about using it on my skin or GBaby's delicate toddler skin. It soaks in well and doesn't sit on your skin. I am so excited about this and can't wait to use up all those other random bottles of lotion that are around my house!
I've read that the shelf life of homemade lotions can vary depending on how you package them. Since I just made mine this week, I can't speak to that yet. I'm going to be making small batches frequently. It took less than ten minutes to mix this up, so replenishing frequently is not a big hardship of time. When I made about 12 ounces of natural lotion for less than $2. That totally works for me!
Updated 1/30/2013: We've been using this lotion for the last two years and it's great. I've only had "shelf life" issues with one batch that I substituted coconut oil for the olive oil over the summer. Other batches with this substitute were fine. I wrote it off as a fluke and have been through lots and lots of this great stuff!
Friday, October 15, 2010
Freezer Friday: Sugar Cookies Made Easy
A couple years ago I came upon a great frosting recipe that sets beautifully and dry on the surface but moist underneath. Bingo! That takes care of part of the dilemma. But what about the mess of mixing, rolling, and cutting? This year I decided that I could mix, roll and cut all in one big party, and then freeze the cut out cookies before I bake them. Pull what I need for a given occasion and bake them. Mix up frosting and voila! Ready to go with half the mess.
So, here's how it breaks down:
1. Make a batch (or 2) of your favorite sugar cookie recipe. I use The Best Rolled Sugar Cookie recipe and it has always turned out great. When I mix two, I'll mix the first, empty the bowl, and then mix the second - in my world of dish loathing there's no point in washing in between if you're making the exact same recipe.
2. Roll, cut, layer, freeze. Repeat. Repeat. Repeat. Until the dough is gone. A round cookie cutter (glass) will give you an all occasion shaped cookie. I am working with pumpkins and fall leaves as I have three parties coming up for which fall theme will be appropriate. Once the cookies were frozen between layers of wax paper, I stacked them in a plastic container before they found their somewhat temporary home in the freezer.
3. Pull and bake what you need and mix up an adequate amount of icing. I love this recipe because you can dip your cookies in and it dries glossy. Take a bit of the remaining icing and add a little more powdered sugar to thicken it up and it pipes on nicely for accents. If you don't have a pastry bag or decorating tips, no problem. Put the frosting in a freezer zip top bag and cut a tiny opening in one of the corners. Decorate away.
4. Once the frosting has set, your cookies can be stacked and displayed on a tray - party perfect!
Then, the next time you need a cookie tray, repeat steps 3 and 4 until your freezer stash of cookies is gone.
This post is linked up at Life As Mom's Frugal Friday: Gearing Up for the Holidays.
Wednesday, October 6, 2010
Beans & Rice
Wednesday, September 1, 2010
Roasted Red Peppers
Remember that pile of red peppers that made it to the freezer? I had 6 peppers left over after the pepper bomb construction that needed to be stored. But I was out of freezer bags (during harvest season - oh the horror!). So I decided to roast them. I love the smell of fresh roasted peppers and the flavor even more. I roasted them on the grill and it was super easy!
Step 1- Wash Peppers
Step 2- Grill Peppers: Heat up the grill and place whole peppers on the grill over medium high heat. Turn every 3-6 minutes until the peppers are good and charred.
Step 4- Steam: Once charred place peppers in a bowl and cover. Allow to sit for 10-15 minutes to steam the skins off.
Step 5 – Remove skin: Once peppers are cool enough to handle, pull the skin off and discard. Cut out stem and remove seeds and discard. Slice roasted pepper meat as you wish.
Step 6- Store: Place peppers in an airtight container. Top off with Olive Oil and toss. Refrigerate jar and use in a timely manner.
So easy, and a great way to use in-season or discounted peppers! So far we have used them in sandwiches, scrambled eggs and they are destined to go in some enchiladas this week too.
This post is linked up at $5 Dinners-Grow.Eat.$ave: Peppers
Wednesday, August 25, 2010
Cheese Making 101: Mastering Method
A number of years ago, I completed a bachelors degree in Applied Mathematics. I am a firm believer in partial credit so I don't consider this cheese making adventure a complete failure. I followed all the directions and ended up with an edible product off of one batch and some amazing ricotta off the other batch. As far as yummy, smooth mozzarella that “pulled like taffy” as my resource web sites here and here described, that was a fail. Overall, in this experience of trying to make mozzarella, I give myself a C.
I tried two batches. One batch I followed the Junkett recipe with a cross between their directions and the directions at Heavenly Homemakers, including hanging it to drain the whey overnight. I think that was mistake number one. The final product of this was a dry, grainy, firm, rubbery ball of curd that doesn't melt, but tastes ok.
With the second batch, the curds looked really promising. I switched to the microwave directions from the Junkett for firming up the curds. Still didn't work. Once it set, the curd was much like a rich, thick ricotta that is very yummy!
I did some research after this project and found this site. From their pictures, I concluded that my milk was not fresh enough. Next time, I'm going to try finding a local brand of milk and give that a try, or try their powdered milk/heavy cream option. Stay tuned for Cheese Making 102.
Thursday, March 11, 2010
Make Your Own Powdered Laundry Detergent
Then I found the recipe for Jabs Homemade Laundry Detergent. He has a great tutorial on how to make this powdered laundry detergent with three ingredients: 1 bar of soap, 1/2 cup Borax, 1/2 cup Washing Soda. Here area few of my notes on the process:
Grating the Bar of Soap I have used the Fels-Naptha soap and found that it is very difficult to get it to break down into a small grain. I tired letting the bar dry out as a commenter suggested and that didn't work for me. So I've resorted to grating the bar of soap, adding the Borax and Washing Soda and then running it through the food processor. This works great
Does it Really Work? Yes. I have used it on the cloth diapers and they come out clean as ever. (*Note, this soap may build up on all-in-one type diapers and non-cotton diapers reducing their absorbency) I still add oxy-whitener to the diapers and whites as I always have and have noticed no difference between this and the expensive green detergent I was using before. The real joy of it -it really only takes 1 1/2 tablespoons per load. Concentrated detergent, less space used in my laundry room.
Less money, less waste, clean clothes. What's not to like?
Friday, February 12, 2010
Yummiest Homemade Yogurt
Instead, to satisfy my cravings for warm summery things, I've been on a yogurt and granola kick. I had bought really good Stonyfield Farm plain yogurt. GBaby loves the stuff and I had been reading some tips on making better yogurt. With the following modification on my original yogurt recipe.
1. Cooling Milk - To start, I brought the milk to 185 degrees per normal, then poured it directly into jars. Then I put the jars in the kitchen sink and ran cool (not cold) water into the sink around the jars. I let the milk cool down for about 20 minutes to 80-90 degrees.t
2. Starter - I put the starter directly from the fridge to the jar, and just dropped the heaping tablespoon(s) into the jars.
3. Incubation - I kept a closer eye on it and only left it in the warm box for about 5 hours, not letting it get warmer than about 105 degrees.
The finished yogurt was absolutely wonderful, rich and creamy. There was not even a hint of tartness. It is particularly yummy alongside the Apple Cinnamon Granola Bars and Blueberry Almond Granola (which I will post soon).
Tuesday, December 8, 2009
Three Cheese Souffle
Souffles are meant to be a light and airy egg dish and by nature will settle a bit once out of the oven. While there are a few more steps than a quiche or egg bake, the melt in your mouth results are totally worth it. Skim over the recipe and here are a few of my own notes on the process.
The Cheese Sauce
-My milk & butter mixture started to thicken before it ever showed signs of boiling. Once I could stir and see the bottom of the pan, I turned the heat off and added the cheese.
-I grated the cheese with the finest side of my grater - helped it to melt quickly into the base.
-Stop here and you have a great cheese fondue or sauce for homemade mac & cheese.
Eggs:
-I cheated and ran the yolks through my mini-food processor for about 10 seconds so I could do the whites in the Mama Mixer. It seemed to work fine.
Servings:
-This recipe states that it makes 8-1 cup servings. I got that plus two soup-bowl size souffles too.
Friday, November 13, 2009
Freezer Friday: Cookie Dough
We are entering the time of year when requests for baked goods and cookie trays seem to come from every direction. I have a sure-fire system to save you time and energy and put fresh cookies on the table, every time!
The secret: freeze your cookie dough in ready to bake scoops. The Dough Boy does it and charges you for the convenience. The fundraiser companies do it. So why not make your own! The only special equipment you may need is a cookie scoop. Mine is a 2 tablespoon scoop (I think). They can be purchased in the kitchen-wares section of many of your favorite retailers. If you make cookies often, it's worth investing in a solid metal scoop rather than the plastic/metal combo scoops. I burned through two of those before I got the good one and it's been great.
This time of year, I usually have a stash of Chocolate Chip, Molasses, Sugar and Peanut Butter cookie dough in the freezer. Then when the call comes for a cookie tray I can just pull an assortment, bake them up and send them off. No mixing, no mess and very few dishes!
Whenever I make up cookie dough, I make as large of a batch as my MamaMixer can take- usually triple a normal batch. So, this week it was time to replenish my Chocolate Chip Cookie dough stash so off I went. The freezing method will work with any drop cookie dough. For recipes like drop Sugar Cookies or Molasses Cookies that require a dip in sugar, no problem. The dough is already "rolled" from the scoop, simply dip frozen dough in the sugar before baking.
When it comes time to bake your cookies, place frozen cookie dough on a baking sheet. Bake at the temperature your directions call for and add 3-7 minutes to the baking time to allow for the frozen dough. Let them cool, plate them up and enjoy.
I've also discovered the joy of portion control by only baking a small tray in the toaster oven at a time - always warm and fresh!
Friday, September 25, 2009
Freezer Friday: Canned Pumpkin Shortage? No Problem!
This week rumors are flying around the internet about a shortage of canned pumpkin. While I haven’t been able to find anything on the national news sources, one station in Iowa and one in West Virginia have both carried stories this week. Oh dear, what ever shall we do?! With Thanksgiving and Christmas right around the corner, ‘tis the season for pumpkin pies- this could become a major crisis in some households. Now, while our great-grandmothers are rolling with laughter from their graves at our dependence on commercially canned pumpkin, I’ll share a page I’ve taken from their cook-books. It starts with these bright orange fruits that are about the size of a bowling ball and that are probably more prevalent than their canned byproducts. That’s right folks. You can do more with a pumpkin than carve a face in it!
For baking, you want to make sure you procure good pie pumpkins that are generally smaller in size than their carving counterparts. They are also bred to have better flavor and cook up great. Plus, they’re easier to work with! I was able to get them for about $1 a piece at our local farm stand.
First, cut that sucker open and core all the seeds and goo out of it.
Then, put about a half inch of water in a baking pan and place the pumpkin, cut side down into the pan. Bake it at 375 degrees for about 45 minutes, or until a fork will slide into it easily.
Next, carefully turn the pumpkin cut side up and let it cool.
Once the pumpkin is cooled, if you want to create your own “canned pumpkin” simply spoon out the flesh from the pumpkin and run it through a blender or food processor. (or take your immersion blender to it).
1 ¾ cups of pumpkin puree is the equivalent of a 15 ounce can. Measure your pumpkin puree out and freeze these portions. When you’re ready to bake, thaw and use in your favorite recipes.
So in addition to insuring that we will have pumpkin pie this holiday season, it has been another busy week for the MamaMixer
