Showing posts with label Breakfast~Brunch. Show all posts

Wednesday, May 9, 2012

My Homemade Yogurt Just Got Better!

I've been making my Homemade Yogurt for a while now.  I've experimented and perfected my process to come up with the Yummiest Homemade Yogurt.  Or at least I thought so, until today.

I've been making yogurt so often lately that my daughter sees me pouring hot milk into jars in the sink and knows exactly what's going on.  It's still good on granola and with fruit, but the plain yogurt is just that - plain.  I was craving some of the grocery store flavors - like key lime, and raspberry.  When I mentioned to HandyMan that I was thinking of experimenting, he requested vanilla.

If you look at the basic flavored grocery store yogurts, the additives are basically flavoring and gelatin.  I checked out a few recipe sites that had varying combinations of adding gelatin to yogurt and knew I wanted mostly yogurt and just enough gelatin to add flavor and get it to set up a little firmer than our homemade plain.

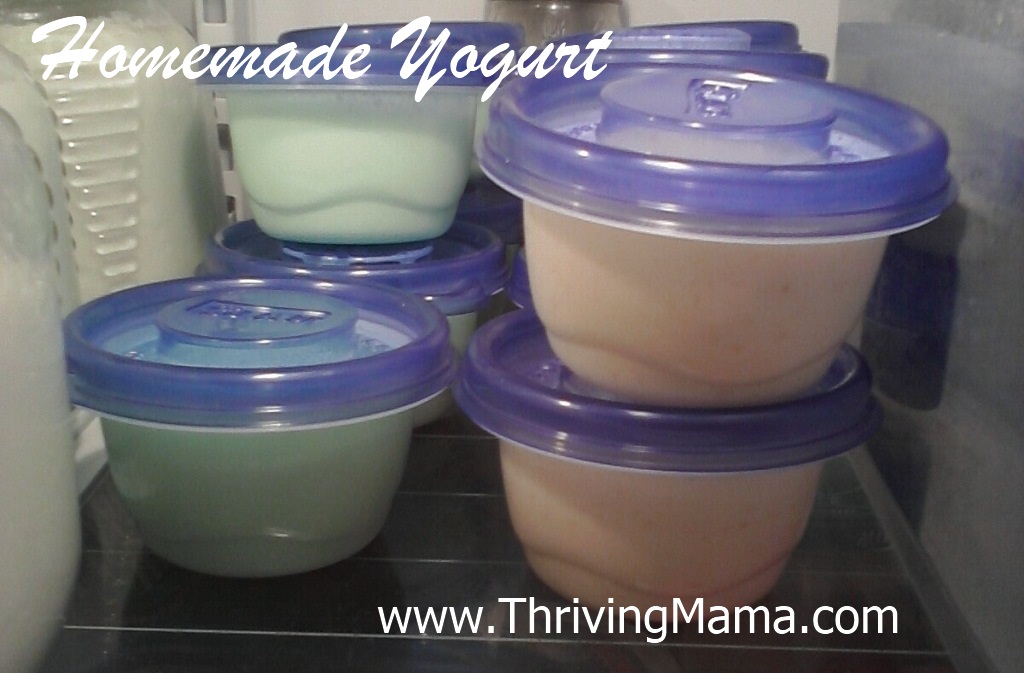
Here's the recipes I tried and they worked beautifully!  The flavors are subtle and the sugar in the recipe and in the gelatin mix adds a bit of smoothness to the plain yogurt.  I got 16 of the little 1/2 cup containers with lids and these make fantastic on-the-go snacks and are easy to toss in HandyMan's lunches.  I think I will probably add some 1-cup containers to the stash too - the 1/2 cups are great for snack size and kiddos, but if I were grabbing one for lunch on the go - it'd be a little small.  I've used yogurt straight from the incubator as well as refrigerated yogurt for these recipes and both worked great!

Homemade Vanilla Yogurt
3 cups Homemade Plain Vanilla
3/4 cup milk
1/3 cup sugar
1 Tablespoon Vanilla Extract
1 envelope Unflavored Gelatin

Bring milk and sugar to a boil.  Add gelatin and stir until completely dissolved.  Then stir some more to really make sure it's dissolved - otherwise you end up with gelatin granule chunks in your yogurt and it definitely takes away from the experience.  Just sayin'.   Add Vanilla and mix thoroughly.  Combine this syrup/gelatin mixture with yogurt in a blender and pour into individual cups or container.  Refrigerate until it sets.


Homemade [Gelatin Flavor] Yogurt
3 cups Homemade Plain Vanilla
3/4 cup boiling water
1- Box of Gelatin (box intended to add 2 cups of water to make 4-1/2 cup servings, flavor of your choice)

Add gelatin to hot water and stir until completely dissolved.  Combine the jello mixture with yogurt in a blender and pour into individual cups or container.  Refrigerate until it set.

***
Cost wise - I've been able to get milk for about $2.15 a gallon and gelatin runs anywhere from $0.35-$0.65 a box.  Calculated out, it runs about $0.13-$0.18 per 6 ounce serving.  The reusable cups were a $5 up-front investment.  All told, it fits quite nicely in my grocery budget!

Next up - experimenting with adding fruits!


Linked up at We Are That Family's Works for Me Wednesdays.


Tuesday, February 21, 2012

Baked French Toast

A while back I posted a picture of a totally yummy Blueberry/Cream Cheese Baked French Toast and mentioned something about trying to post the recipe in the next week or so.  Life took off, illness crept in and time slipped away.  Now I'm making baked french toast again this week and figured it was high time I get a recipe up!

First off, any recipe that can revitalize stale bread is a winner in my book and this recipe is perfect for that.  I also have an egg dish recipe based off of this one that has become a favorite.  So, when the homemade bread starts to go stale, it gets cubed up, thrown in the freezer and saved for one of these recipes.

For the baked french toast:  the blueberry one I made was good, but a little on the egg-y side for my tastes.  So, I've taken the idea from that recipe and merged it with this recipe to come up with my ThrivingMama Baked French Toast.  Also, the fruit amounts are a starting point.  If you like a super fruity breakfast treat, then by all means, add more - I usually do!

ThrivingMama Baked French Toast
This recipe is intended for an 8x8 pan, doubled should work fine in a 9x13 with extended baking time.


4-5 cups cubed bread (1" cubes or smaller)
5 Eggs
1- 1/4 cups Milk
1/2 cup Half and Half
1/4 teaspoon Cinnamon
1 teaspoon Vanilla Extract
2 cups of your favorite Fruit/berries (frozen Cherries & Blueberries work well)
4 ounces Cream Cheese (small cubes)
1/2 cup Sugar

1.  Spray pan with non-stick spray.  Place half the bread cubes in the bottom of the pan.  It should be covered fully.  Sprinkle 1/2 cup of fruit, remaining bread cubes and top with cream cheese cubes and 1/2 cup fruit.
2.  Thoroughly combine (I use the blender) eggs, milk, half and half, cinnamon, and vanilla and pour over bread & fruit.
3. Cover and refrigerate overnight.
4.  Bake at 350 for 25-35 minutes or until completely set in the middle.**
5.  While dish is baking, combine remaining 1 cup of fruit and sugar in a small saucepan to create a syrup. Pour over dish once it's done and serve.

Alternate to fruit & cream cheese:  Make a syrup with 2/3 cup brown sugar, 1/4 cup butter and 2 T. Corn syrup in a heavy saucepan and pour over dish before baking.  Also a yummy treat!


**Note: Do NOT put a cold glass pan in a hot oven, let it come to room temperature before putting in a heated oven.  I've also had good luck putting the whole pan in the oven cold and THEN turning the oven on and the pan warms up as the oven heats - but my oven heats slow.  This may not work safely for you!  Please use your discretion or a non-glass pan.


Tuesday, November 9, 2010

Pumpkin Applesauce Bread

Here's the Pumpkin Bread recipe that I promised forever ago.  With two of the best flavors of fall,  this hearty quick bread is another favorite in my hearty breakfast bread collection.

Pumpkin Applesauce Breadfreezebake2


1 cup Sugar

1 cup Brown Sugar

3 eggs

1/2 cup Oil

2 cups Pumpkin Puree (or 1-15oz can of pumpkin)

3/4 cup Unsweetened Applesauce

1-1/2 cups White Whole Wheat Flour

1-1/2 cups Unbleached All Purpose Flour

2 teaspoons Baking Soda

1 teaspoon Salt

2 teaspoons ground Cinnamon

1 teaspoon ground Nutmeg

1/2 teaspoon ground Cloves

1/2 teaspoon ground Ginger

Directions

1.  Cream together oil, sugar and eggs.  Add pumpkin and applesauce and blend thoroughly.

2.  Sift all dry ingredients together into the liquid batter and mix thoroughly.

3.  Pour into two prepared loaf pans.  Bake for 40-60 minutes at 350 degrees (until a toothpick inserted comes out clean)  You can also bake as muffins for about 20 minutes.

Linked up at An Oregon Cottage's Tuesday Garden Party and Life As Mom's Ultimate Recipe Swap for dishes that travel well. Check them out for more great recipes.

Wednesday, November 3, 2010

Drop Biscuit Baking Mixes

At some point a while back, one of the blogs I follow (don't remember which one) featured the idea of mixing up all the dry ingredients of things you bake often, so when you make them you just have to add the wet ingredients.  I love the concept behind this because then I know exactly what is in my baking mixes.  With the winter months falling quickly upon us I decided that it would be worth the prime real estate in my pantry to keep three containers of biscuit mix and three containers of cornbread mix.  I have to refill then once a month - and I usually do this when I go to make said bread the 4th time and there's no mix ready.  So one portion to a bowl, three portions to my containers.  Ingredients out once.   Priceless.  It may seem like a little thing, but these little things make things so much easier at dinner time when the Toddler is melting down and hasn't napped and your head hurts and... I digress.

So, I started with this recipe for biscuits and have modified it a bit and end up with perfect, Whole Grain Drop Biscuits every time.  I've even started substituting in 1/4 cup of applesauce, pureed pumpkin or pureed butternut squash for 1/4 cup of the butter/margarine just to cut the fat down a little bit and I haven't noticed a difference in the final product -besides the applesauce adding a little sweetness.

Without further ado, ThrivingMama's Drop Biscuit Mix:

biscuitmix1Drop Biscuit Mixes


1 cup Unbleached All Purpose Flour

1 cup White Whole Wheat Flour

2 teaspoons Sugar

1 Tablespoon Baking Powder

1/2 teaspoon Baking Soda

1/2 teaspoon Cream of Tartar

1/4 teaspoon Salt

BiscuitMix2

Combine all dry ingredients in a 2-3 cup storage container.  Be sure to labelyour container with the contents, wet ingredients to add and baking directions to keep things super simple!

When it's time to bake, add

1 cup Milk and

1/2 cup Butter or Margarine, softened

and enjoy a meal time that 's a little bit easier!

This post is linked up at We Are That Family's Works for Me Wednesday Fall Recipe Swap

Monday, June 21, 2010

Father's Day Monday: Strawberry Crepes

fdcrepe3 Yesterday most of the country celebrated Father's Day.  Since HandyMan works on Sundays and has Monday's off , we celebrated Father's Day Monday this morning.  We went strawberry picking yesterday and today we had Strawberry & Cream Cheese Crepes.  I used this recipe for the crepes.

As the second side of the crepe was cooking, I added a slice of cream cheese to soften, added sliced strawberries out of the pan and it was pure perfection.

fdcrepe1

fdcrepe2

Often flipping the crepes can be a problem.  Only after breakfast did I find this page which has a method for making crepes with two pans that is genius!  I'm already planning my next crepe adventure for 4th of July Weekend (yup Mom, that's while you're here!)

Tuesday, May 18, 2010

Cheese Soufflé Variations

DSC03697HandyMan is out of town this week, which means my breaks to be online are limited to when the adorable girl pictured to the right, decides to take a nap.

Yesterday I made a batch of the Cheese Soufflé that I posted about a while back and they are still oh-so-yummy!  I modified this time around and browned up 1 pound of breakfast sausage with a bell pepper and a small onion and put that mixture in the bottom of the baking dishes and pouring the soufflé batter on top.  This is a great variation and I also look forward to adding chopped spinach and asparagus from the garden to this wonderful cheesy dish.  Once I have enough glass dishes to spare, I'm also hoping to experiment with freezing the dishes for future baking.

Posts will be sparse this week.  For now, off to finish up a few more things before my "helper" wakes up from her nap!

Tuesday, May 4, 2010

HV Blueberry Bread

blueberrybread

I have to admit, while trying to use up the yellow squash in my freezer I've come up with some hidden veggie recipes that were tolerable but not worth sharing. However, I struck gold with this on on Saturday. It turned out delicious! You can make it in loaf pans as a bread or it would be just as yummy in square/rectangle pan as a coffee cake. Just adjust your baking times accordingly.

HV Blueberry Bread


3/4 cups Margarine
1 1/2 cups Sugar
3 Eggs
3/4 cups pureed Yellow Squash
3/4 cups Milk
2 teaspoons Vanilla
3 1/2 cups Flour (I substituted 1-1/2 cups White Whole Wheat and it was great!)
2 1/2 teaspoons Baking Powder
2 cups Blueberries (fresh or frozen)

1. Cream margarine and sugar together. Add Eggs and vanilla and beat until smooth.
2. Add squash and milk and blend thoroughly.
3. Add flour and baking soda and mix. Once batter is smooth, fold in blueberries.
4. Spoon batter into greased pans (2 loaf pans or 1-9x13) and bake at 350 until inserted toothpick comes out clean. 40-60 minutes for loaves, 35-45 for pans.

Enjoy!

Linked up at $5Dinners Yellow Squash Grow Eat $ave post.

Monday, March 8, 2010

Homemade Granola

granola3I have fond childhood memories of making  fresh granola and homemade yogurt with my mom.  Since apples rarely fall far from the tree, this is a practice that is now a regular activity in my kitchen.  I make a batch of granola that will usually last us the month and make fresh yogurt a quart at a time as the Yogurt Jar empties.

Here is my Base Granola Recipe, with lots of room for personalization.  As you can see, in the pictured batch I used dehydrated blueberries from last summer and slivered almonds - so good!  Enjoy!

Base Granola Recipe


6 cups Rolled Oats

1/2 cup Wheat Germ

1/2 cup Flax Seeds

1/2 cup Brown Sugar

3/4 cup Vegetable Oil or Melted Butter

3/4 cup Honey

Up to 4 cups of Add-Ins in any combination (your imagination is the limit here - anything you like will work!):


Before Baking: pecans, walnuts, slivered almonds, sunflower seeds, coconut


After Baking: dried fruits (dried cranberries, dried blueberries, raisins)


Directions:

1. Thoroughly combine all ingredients (except "After Baking" Add Ins).


2.  Spread mixture out on a jelly-roll pan (cookie sheet with sides), or a broiler pan.  It shouldn't be more than about 1/2 deep and you may need to bake it in multiple batches.

3. Bake at 325 degrees for 15 minutes and remove from oven and carefully stir the mix.  Bake for an additional 10 minutes at a time and then 5 minutes at a time as it gets closer to your preference of toastedness.  Make sure to stir thoroughly in between baking times and monitor closely as it begins to toast as it can go from golden brown to burnt in a matter of minutes.


Let cool and enjoy!  Store in an airtight container for best freshness.


Click here for a printable version of this recipe.

Friday, February 12, 2010

Yummiest Homemade Yogurt

I take a break from Freezer Friday this week as we are working on eating what we have and not "stock-piling".

Instead, to satisfy my cravings for warm summery things, I've been on a yogurt and granola kick.  I had bought really good Stonyfield Farm plain yogurt.  GBaby loves the stuff and I had been reading some tips on making better yogurt.  With the following modification on my original yogurt recipe.

1. Cooling Milk - To start, I brought the milk to 185 degrees per normal, then poured it directly into jars.  Then I put the jars in the kitchen sink and ran cool (not cold) water into the sink around the jars.  I let the milk cool down for about 20 minutes to 80-90 degrees.t

2.  Starter - I put the starter directly from the fridge to the jar, and just dropped the heaping tablespoon(s) into the jars.

3.  Incubation - I kept a closer eye on it and only left it in the warm box for about 5 hours, not letting it get warmer than about 105 degrees.

The finished yogurt was absolutely wonderful, rich and creamy.  There was not even a hint of tartness.  It is particularly yummy alongside the Apple Cinnamon Granola Bars and Blueberry Almond Granola (which I will post soon).

Friday, January 15, 2010

Freezer Friday: HV Lemon Blueberry Muffins, etc.

The next couple of weeks are going to be bringing company to our home which means that I'm going to need to be cleaning up the house, and not cooking so much.  So, this week I did some freezer stocking.  I made a triple batch of this Spanish Rice Bake and put two batches in the freezer.  The key is the cilantro garnish - don't skimp on it,  it makes the dish!  I also put a batch of the Corned Beef and Cabbage Stew in the freezer.

Whentimesaver I browned up the beef/TVP mix for the Spanish Rice Bake earlier this week, I cooked up extra and divided it.  I used half for the Bakes and half for Taco Meat.  One skillet, washed once: I love saving time and doing less pot scrubbing!  Two containers of Taco Meat went to the freezer and one in the fridge for today.

My baking project of the week was Hidden Veggie Lemon Blueberry Muffins.  I used up blueberries and frozen squash puree from my freezer.  They were a great combination of sweet and tangy!

HV Lemon Blueberry Muffinsblueberrylemon2

1/2 cup melted butter
1 1/2 cup white sugar

1/3 cup lemon juice

3 eggs
1 cup pureed squash

3 cups all-purpose flour (sub 1c Whole Wheat)

2 teaspoon baking powder

2 teaspoon salt

1/2 cup milk

2 cup fresh or frozen blueberries

Directions
1.  Combine butter, sugar, lemon juice, eggs and squash puree until smooth.
2.  Add dry ingredients and mix well.  Then add milk and combine until smooth.
3.  Fold in blueberries and nuts.

blueberrylemon1
4.  Bake as muffins for 20-25 minutes at 350 degrees or as two loaves for 50-75 minutes.

Click here for a printable version of this recipe.

Tuesday, December 8, 2009

Three Cheese Souffle

3chssouffle8Monday is HandyMan's day off and I like to make brunch as our mornings are usually a little slower paced than the rest of the week.  This week I made this Three Cheese Souffle recipe and it turned out beautifully and rather tasty as well.  I think it has made it on the "Christmas Brunch" menu and I'm going to try the Editor's note and mix it up ahead of time and freeze it and see how it turns out.

Souffles are meant to be a light and airy egg dish and by nature will settle a bit once out of the oven.  While there are a few more steps than a quiche or egg bake, the melt in your mouth results are totally worth it.  Skim over the recipe and here are a few of my own notes on the process.

The Cheese Sauce

-My milk & butter mixture started to thicken before it ever showed signs of boiling.  Once I could stir and see the bottom of the pan, I turned the heat off and added the cheese.

-I grated the cheese with the finest side of my grater - helped it to melt quickly into the base.

-Stop here and you have a great cheese fondue or sauce for homemade mac & cheese.

Eggs:

-I cheated and ran the yolks through my mini-food processor for about 10 seconds so I could do the whites in the Mama Mixer.  It seemed to work fine.

3chssouffle5-I didn't read the directions close enough and didn't let the cheese sauce cool.  It didn't seem to matter.  I poured the cheese along the side of the mixer bowl so that it actually pooled under the egg whites without disturbing them too much.  Then, gently, mixed with a large rubber spatula until it was all combined.  The mixture should be thick and foamy, but pourable. (think airy cake batter)

Servings:

-This recipe states that it makes 8-1 cup servings.  I got that plus two soup-bowl size souffles too.

Wednesday, December 2, 2009

Cinnamon Rolls

I am very fond of warm cinnamon rolls.  This recipe is great for batch cooking and the frozen batches reheat well enough that you'll never guess that they spent time on ice.  Topped with cream cheese frosting, these delectable pastries are great on a brunch menu or on their own.  Along with the recipe below I've included some tricks and time savers for you as well so be sure to read through and the printable recipe is at the bottom of this post.

Cinnamon Rolls

Ingredients


Dough:

2 packages Yeast

1c. Warm Water

2/3 c. + 1 tsp. Sugar

1 c. Warm Milk

2/3 c. Butter

2 Tsp. Salt

2 Eggs, beaten

7-8 c. Flour

Filling:

1 c. melted Butter

1 c. Brown Sugar

1/2 c. Sugar

3 Tbs. Cinnamon

Directions

1. Place yeast  and 1 teaspoon of sugar into warm water.  Stir to dissolve and let it sit.
2. Warm milk, 2/3 cup butter and remaining sugar in saucepan over low heat until butter is melted and let cool.
3.  Place 6 cups of flour in large bowl.  Place yeast and milk mixtures and beaten eggs in bowl with flour.  Mix thoroughly.
4.  Add remaining flour a bit at a time until dough is workable.  It should be very soft and slightly sticky.  Knead 5-10 minutes or until smooth.
timesaver 5.  Allow dough to rise until at least double in bulk.  Punch down and let rest for 5 minutes. Combine dry filling ingredients.  Time Saver: dough can be mixed up and put in the refrigerator to rise overnight, cutting down prep time in the morning.  Just allow dough to warm a bit before trying to roll it.


cinnrolls1
6.  Separate dough into 6-8 sections to work with.
7.  Roll each section, one at at time, out into a large rectangle.  Keep in mind that the dough will double again when it bakes, and gauge your thickness accordingly.
8.  Brush dough with melted butter and sprinkle the filling on top of the butter.

cinnrolls2
9.  Roll dough into a long log, making sure to keep dough tight and slice off cinnamon rolls.  Make sure to use a very sharp, thin knife or Cool Trick: use a piece of thread.  Bring thread under the roll, cross the ends over the top of the roll and pull tight - perfect cut every time - no mashing and mangling!

cinnrolls3

10.  placed on greased baking pans or sheet.  Allow room for the dough to rise and let rise 30 minutes before baking.

cinnrolls5
11.  Bake 25-30 minutes at 350* or until golden brown. Another Cool Trick:  immediatly after you take your cinnamon rolls out of the oven, dump them upside down on platter or cookie sheet to cool.  This allows the filling to cool in your cinnamon roll instead of melting all over the bottom of your pan.

cinnrolls6

cinnrolls7
12.  Frost with your favorite vanilla or cream cheese frosting. (I use 1 package of cream cheese, 1 stick of margarine (both softened) and 2 cups of powdered sugar add milk 1 teaspoon at a time for desired consistency if necessary).

Click here for a printable version of this recipe.

Friday, October 2, 2009

Freezer Friday: Tropical Banana Bread/Muffins

freezerfridaysm This week was banana week in my kitchen.  I ended up with a bunch of bananas that needed to be baked with.  So I made GBaby Teething Biscuits/Cookies, and I made a bunch of Banana Pancakes that have made it to the freezer and I also made the following Tropical Banana Bread.  I made a double batch and put two loaves and almost two dozen muffins into the freezer for later. On a completely different note, I also made TVP Meatballs this week and froze a bunch.  I will try to get that recipe up soon.

Tropical Banana Bread
2 Eggs

1 cup Brown Sugar

2 cups Pureed Bananas

2 teaspoons Vanilla Extract

1/2 cup Vegetable Oil

1/2 cup Pineapple Juice

3 cups Unbleached Flour (can substitute up to half whole wheat)

1 teaspoon Baking Soda

1 cup chopped Walnuts

1 cup crushed Pineapple

1 cup flaked Coconut


Directions

1. Preheat oven to 350*

2. Beat eggs and brown sugar together.  Add bananas, vanilla, vegetable oil and pineapple juice and blend until smooth.

3. Add flour and baking soda and mix thoroughly.

4. Mix in walnuts, pineapple and coconut.

5. Pour batter into two greased loaf pans or into prepared muffin tins (makes 2 dozen).

6. Bake loaf pans for 50-60 minutes and muffins for 17-25 minutes or until inserted toothpick comes out clean.

Click here for a printable version of this recipe.

Friday, September 25, 2009

Freezer Friday: Canned Pumpkin Shortage? No Problem!

pumpkin1Updated 9/30/2010: This post has been linked up at Life as Mom's Ultimate Recipe Swap.  This is a great way to bring fresh pumpkin to your favorite pumpkin recipe- and it freezes great!

This week rumors are flying around the internet about a shortage of canned pumpkin.  While I haven’t been able to find anything on the national news sources, one station in Iowa and one in West Virginia have both carried stories this week.  Oh dear, what ever shall we do?!  With Thanksgiving and Christmas right around the corner, ‘tis the season for pumpkin pies- this could become a major crisis in some households.  Now, while our great-grandmothers are rolling with laughter from their graves at our dependence on commercially canned pumpkin, I’ll share a page I’ve taken from their cook-books.   It starts with these bright orange fruits that are about the size of a bowling ball and that are probably more prevalent than their canned byproducts.  That’s right folks.  You can do more with a pumpkin than carve a face in it!

For baking, you want to make sure you procure good pie pumpkins that are generally smaller in size than their carving counterparts.  They are also bred to have better flavor and cook up great.  Plus, they’re easier to work with!  I was able to get them for about $1 a piece at our local farm stand.

First, cut that sucker open and core all the seeds and goo out of it.

pumpkin2

Then, put about a half inch of water in a baking pan and place the pumpkin, cut side down into the pan.  Bake it at 375 degrees for about 45 minutes, or until a fork will slide into it easily.

pumpkin3

Next, carefully turn the pumpkin cut side up and let it cool.

pumpkin4

Once the pumpkin is cooled, if you want to create your own “canned pumpkin” simply spoon out the flesh from the pumpkin and run it through a blender or food processor. (or take your immersion blender to it).

pumpkin6

1 ¾ cups of pumpkin puree is the equivalent of a 15 ounce can.  Measure your pumpkin puree out and freeze these portions.  When you’re ready to bake, thaw and use in your favorite recipes.

So in addition to insuring that we will have pumpkin pie this holiday season, it has been another busy week for the MamaMixer and the Food Grinder/Strainer Attachment .  I have put away pear baby food, another batch of applesauce with results that were as great as last time.  I also made a batch of Zucchini Chocolate Chip Muffins from this recipe that turned out great.  (I stayed pretty close to the recipe but I did sub in 1 cup of whole wheat flour, cut the cinnamon out and upped the nuts and chocolate chips to 1 cup each.)  Did you get anything stashed in your freezer this week?

Tuesday, August 25, 2009

A to Zucchini Sweet Bread

I cannot tell you how much I love this recipe.  I made two loaves – we had one for breakfast and snacks and the other I served with ice-cream for dessert and it was perfect.  While I had hoped to send one to the freezer, that didn’t happen so I’m going to have to try again!  It not only uses the zucchini that I have coming out my ears but I could also use my homemade plain yogurt – double bonus!

For this time around I used dried cranberries, chopped pecans and brown sugar for the filling.  The bread is vanilla-y sweet and neutral that you can easily substitute just about anything for the filling – that’s where the A to Zucchini comes in.  Options for fillings: apples (diced), blueberries, chocolate chips, dried apricots … you get the idea.

You can also make it as loaves or in a tube or Bundt pan if you need a coffee cake or dessert.  A simple glaze can be made from 3/4 cup Powdered Sugar, 1 teaspoon Vanilla Extract and 2 teaspoons Milk if you’d like to frost this as a dessert cake.  So experiment, and be sure to come back and tell us how yours turned out!

A to Zucchini Sweet Bread atozuccbread5


Ingredients

1/3 cup Vegetable Oil

3/4 cup Sugar

2 Eggs

3 teaspoons Vanilla Extract

1 1/3 cups Plain Yogurt

3 cups All Purpose Flour

1 1/2 teaspoons Baking Powder

1 teaspoon Baking Soda

1/2 teaspoon Salt

2 cups Shredded Zucchini


Filling:

1/2 cup Pecans

1/2 cup Dried Cranberries

1/2 cup Brown Sugar

(Brown Sugar may be omitted, feel free to be creative with your filling – you will need about 11/2 cup of the filling items of your choice.)

Directions:

  1. Beat together Vegetable Oil, Sugar and Eggs and Vanilla in a large bowl.  Mix in Yogurt.

  2. Add dry ingredients and mix thoroughly.

  3. Mix in Zucchini.  Batter will look like this:atozuccbread1

  4. Combine Filling ingredients in a separate bowl.  atozuccbread2

  5. Batter will be divided between two greased loaf pans.  Pour one third the batter in the bottom of the pans.  Sprinkle half the topping over the batter.  Continue with batter layer, filling and remaining batter. atozuccbread3

  6. Bake at 350° for 50-60 minutes or until toothpick comes out clean.atozuccbread4


Click here for a printable version of this recipe.

Thursday, August 13, 2009

HV Zucchini Bread


Update 7/17/2010: If you've landed here from $5 Dinners Grow. Eat. $ave. series, Welcome!  Please take a moment to look around.  This zucchini bread recipe is still one of my go-to zucchini bread recipes!. It is quick and easy, moist and freezes beautifully!  It's also really good with cream cheese. Click here for more of my zucchini recipes including Veggie Spaghetti Quick Dinner and [Green] Potato Soup.


This is another one of those hearty quick breads that is great for breakfasts or snacks.  While it's obvious that there will be veggies in zucchini bread, this particular recipe is absolutely packed with veggies!  You can substitute your pureed squash for the pureed zucchini in this recipe and you can also substitute in up to 2 cups of whole wheat flour for more whole grain goodness!  Still need to find uses for more zucchinis?  Check out this article.

Zucchini Bread


Ingredients

3 cups shredded Zucchini

1 cup pureed Zucchini (or Yellow Squash)

2 Eggs

1/2 cups Vegetable Oil

2 cups Sugar

3 cups Flour (can substitute up to 2 cups Whole Wheat)

1 teaspoon Baking Soda

1 teaspoon Baking Powder

1 Tablespoon Cinnamon

Directionszucchini bread6

1.  Preheat oven to 350 degrees

2.  Cream together eggs, oil and sugar.

3.  Add Zucchini puree and blend.

4.  Mix your dry ingredients in a separate bowl then add to your batter.

5.  Add shredded Zucchini to the batter and mix thoroughly.

6.  Divide batter between two, greased, loaf pans.  Bake for 45-60 minutes or until inserted toothpick comes out clean.

Click here for a printable version of this recipe.

Saturday, August 8, 2009

HV Spiced Applesauce Bread/Muffins


Updated 9/16/2010 -Hi!  If your visiting from LifeAsMom's Ultimate Recipe Swap - Welcome!  I posted this last year about this time and it's time to add this one to the menu again. Enjoy :)

Once I drag myself out of bed, I usually hit the ground running.  The chore list, dirty diapers, and well being of GBaby usually take priority over a lingering breakfast.  For me breakfast needs to be something that I can grab quickly and will fill me up for a while.  I enjoy hearty breads recipes that can be made as loaves or muffins and easily enjoyed fresh or frozen.   This recipe can be made as muffins or as a loaf and is great warmed or toasted.  For an extra energy kick, it's also very good with cream cheese.  Enjoy!


HV Spiced Applesauce Bread/Muffins


Ingredients:

1 1/2 cups Applesauce

1/2 cup Squash or Zucchini Puree

1/2 cup White Sugar

1/2 cup Brown Sugar

1/4 cup Vegetable Oil

2 Eggs

2 cups Flour (may substitute up to 3/4 cup Whole Wheat flour)

1 teaspoon Baking Soda

1/2 teaspoon Baking Powder

1 teaspoon Ground Cinnamon

1/2 teaspoon Ground Nutmeg

1/2 teaspoon Ground Allspice

Crumb Topping:

1/3 cup melted Margarine or Butter

1 cup Oats

1/2 cup Flour

Directions:

1.  Preheat oven to 350 degrees Fahrenheit

2.  Beat Eggs, Vegetable Oil and Sugars.  Add Applesauce and Squash Puree and mix thoroughly.

applebread1

3.  In a separate bowl, mix together all dry ingredients and add to the mixture of liquids and mix thoroughly.  (Or if you are comfortable with cheating, dump in flour(s), then spices then baking soda and baking powder and then mix until thoroughly combined.)

applebread2 applebread3

4.  Spoon batter into a greased loaf pan or muffin tins (1 loaf or 18 muffins).

5.   Mix up the crumb topping and spoon on top of loaf or muffins.

applebread5

6.  Bake muffins for 20-25 minutes, and loaf 45-60 minutes or until toothpick comes out clean.

applebread6

For a printable version of this recipe, please click here.

Nutrition Facts from http://caloriecount.about.com